Achieve Cross Browser Support When Using Custom Font

Applying Custom Font Blogger

Blogger has some nice font that you can choose from, but after sometimes you might feel the old fonts from blogger are really lame and you wanted to change them to the new one. Changing a custom font is easy but make it compatible with most browser is a little bit harder. 
When applying a font you will need to use a CSS member declaration @font-face, but using this one doesn't automatically make your blog compatible with most browser. Not all browser support the same fonts format, this table will tell you what type of font is compatible with a browser.
Browser Compability
As you can see right there Internet Explorer support only one type of font which is the .eot, mozilla with .ttf or .otf, Chrome with .svg, .ttf, and so on. So this basically tell us what type of font that we need to find to achieve a cross browser compability.

Step 1. Finding the font

The first step that you need to do to apply a custom font to your blog and make it cross browser compatible is finding the font that you want. There are a lot of website there that provide you with free fonts, one of the website that I found quite useful and with a cool design is http://www.fontex.org. In there you just need to search for the font that you wanted to use and then download it. You will get a .zip file, just extract that one, and you will get something like this.

Download FontNow after you get this you have completed this step and ready for the next one/

Step 2. Converting the font to each format

So like what you see there what we need is the format .eot, .ttf and .svg to make our font compatible with all browser. Now what you need to do is just convert the font that you have downloaded into one of these format, and if you think it is hard, well it is not because there is a website that let you convert the font into those format.

Visit this website @font-face kit generator, and then upload the font that you want to use there. Just wait for a few moment and they will send you a .zip file which contain all the format that you need.

Step 3. Uploading the font

Now after you got all the fonts that you need, you just need to upload those font into the web. For me I usually use dropbox to upload it into the web. Just create account on dropbox website and then upload all the fonts with these format there ( .eot, .svg, .ttf ). 

Step 4. Applying the font to your blog

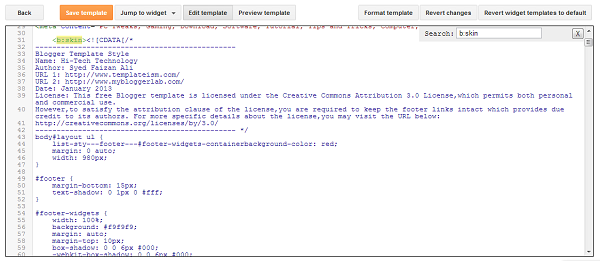
After you upload all of the font format, you just need to copy each of the link to that font and save it in notepad just to make it easy. Now head to blogger and then go to the Template and then to Edit HTML, and head to <b:skin></b:skin> and put this code somewhere there, don't put it in the bottom though because it might lead to some error in displaying the font. Here is the Code : 
 @font-face {
    font-family: 'Arvo Regular';
    src: url('.eot url');
    src: local('Arvo Regular'), 
         local('Arvo'), 
         url('.ttf url') format('truetype'),
         url('.svg url#font') format('svg'); 
}
So that just it but make sure to change the name of the font in the font-family, in the src: local('Arvo Regular') and in local('Arvo'). So the first src: url simply tells internet explorer where they can get the font that is compatible with the browser. The second one is for the other browser except IE. the first and second src: local tells to check if the user already have the font, if he/she already have one skip the next step. 

Step 5. Using the font in your blog

Applying Font

If you want to change the whole font in the post head to .post-body in Edit HTML and change the font family name to match the one that you put before. Just make sure to put ' ' if the name consist more than one character. If you found any trouble just comment bellow and I will sort that out.

Subscribe TECHNOZZZ for more info about tech
Read our tutorial to make smartphone battery last longer

How to Enable Google Plus Comment in Blogger

Google + Banner

Google has launched their social media platform in 2011, which they called Google Plus. At first Google Plus doesn't really attract a lot of user, because most of the people already use facebook back then. But Google tried hard so that their social media can gain a lot of user, they started by merging together blogger account with google plus account, and they also tried to replace the default blogger comments with the new Google Plus comments.
The good thing about Google Plus comments
Google decided to replace the default blogger commenting system with their google plus commenting system. There are a lot of thing that you can get from Google Plus comments, here is a list of new feature that is implemented on the new comments.
  • Threaded Comments, threaded comments is a nice feature that you can get just by adding Google Plus comments to your blog. Threaded comments allow the visitor from your blog to reply to other comment. It is a good thing that will make the conversation become much easier than using the default blogger comments.
  • Privacy Setting, the visitor from your blog would be able to make their comment  public or private, it is a nice thing for the visitor if they just want to make their comments private and cannot be seen by other visitor.
  • Edit Comment, one of the bad thing about the default blogger comments is the you cannot edit the comment that you have posted. So with the new Google Plus comments you don't need to post a new comment just to edit the old one
  • Integrated Feature from Google Plus, by using the Google Plus comments the feature from google plus will also be implemented on your commenting system. One of it the ability to (+1) the comments just like in google plus and the comments that you have written can also be shared to Google Plus.
Okay that is the good things about Google Plus comments, but everything must have a bad thing as well, so this is a list of thing that you need to consider before implementing the Google Plus comments.
  • Visitor must have a Google Plus account to comment on your blog, this may become the worst thing about this comment system, because of this there might be less comment on your blog
  • All comments will be deleted if you change the domain name, so just implement this comments after you stick with your domain name
  • Google Plus comments system would not work for private or adult blogs

How to implement Google Plus Comments to your blog

Google Plus Comment System

So now you know what is the advantage or the disadvantage of implementing Google Plus comments on your blog, now if you wanted to activated this one what you need to do is head to Google+ section on your blog's dashboard and then check the box that says 'Use Google+ Comments on this blog'.
Now just head to your blog and see if the new comments are working. If you don't see any changes or the comments on your blog suddenly disappeared you must have use a custom blogger template and if you do what you need to do is just follow this steps to Implement Google Plus comments on custom blogger template
1. Head to Template and then to Edit HTML
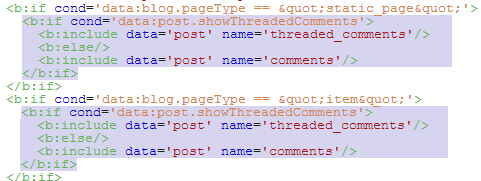
2. Find this set of code
3. Replace the highlighted code with this code
<b:include data='post' name='comment_picker'/>
4. Just save the changes and you are good to go

That is all for our tutorial to Enable Google Plus Comment in Blogger, check out other tutorial at TECHNOZZZ, check out our tutorial to add meta description to your post to improve SEO

Improve Seo by Adding Meta Description to Blogger

Hello world today I proud to announce a new category for this blog that involve all around blogging by using blogger platform. Today as the first post in our new category I will post how you Improve Seo by Adding Meta Description to Blogger. Although Meta Description nowadays in not that important to rank a website it still is a factor wheter the user will click your website or not. 

What is Meta Description

Meta Description
Meta description shown as the description bellow the search result
So what is meta description?. Meta Description is a meta tag used by a lot of search engine to know the description of a page from a website. As shown above google used meta description to let the user know what lies between the website. As I just stated above, it is not really a great factor to determine the rank in SERP. But a well optimized and catchy meta tag will allow you to attract more visitor to your site

Adding Meta Description

Add Meta Description
To add meta description you just need to do the following things. Head to blogger and click the website that you want to add meta description, and then click "Settings", in there just edit the Description. Make sure you choose yes on"Enable search description", and then put the description of your website just bellow it. 

Add Meta Description
Wait you are not done yet, you still haven't add unique meta description for each of your post. To do this just head to Posts, and then click edit on the post that you wanted to add meta description. If you choose yes on "Enable search description" you should be able to find "Search Description" just on the right side of it. Click on it and put the meta description of your post on it. If you done this two step, you just need to check if your meta description is already there, visit this website, and put the link of the page that you wanted to test, and then press submit. After doing that make sure that the meta description that is listed on that website matched the one in yours.

What if Meta Description does not work

Don't panic if you already did those step above and the Meta Description on that website shows up emtpy. You might used a custom blogger template, and some of them proved to have some trouble with the blogger interface, so if you use one you just need to put some code in the <head> section of your blog. To do this navigate to Template and Edit HTML and then find <head> put the following code just after it.

<b:if cond='data:blog.metaDescription != &quot;&quot;'>
<meta expr:content='data:blog.metaDescription' name='description'/>
</b:if>

After you done this make sure that the meta description displayed properly on the website that I pointed out earlier

Click for more info about gaming and pc tweaks
Confused between Crusader Kings 2 and Europa Universalis IV? check the post out

How to Improve Alexa Rank for Your Blog

Alexa

Alexa has become one of the most used factor for determining if a blog have a lot of traffic or not. Although it is widely used back then, nowadays not a lot of people still care for alexa rank. But still there might be some people out there who interested on your blog because of your blog has a good alexa rank. So here I will tell you some quick tips to improve alexa rank for your blog

How does Alexa rank work?

Before we head on to improve the rank of our blog in alexa, we need to know precisely how does alexa rank your website. Simple search in goolge provided me with some information of how this amazon's company alexa determine the rank of their website. Alexa tracks the people that used their alexa toolbar, this is where they get their data. At first I was bit sceptical, so I run a little test here. 
I installed alexa toolbar a few weeks a go in my chrome ( really do I need to use in or on here? ), so I keep visiting my blog everyday, and my alexa rank went down ( improved ). And here is what I got from alexa traffic tracker or whatever they called it there
Alexa Traffic

98,9% of the visitor in my blog comes from my country, this is not a really solid prove so I gave you some screenshot of my audience that I got from blogger
Blogger Audience
Like what you can see here, most of my visitor comes from United States which is above 50% of my total visitor, now why does all my visitor that comes from United States doesn't get tracked in Alexa? Because alexa only track visitors who have their toolbar. And they used this data to determine the rank of the blog, this explain the inaccuracy from Alexa rank, so it doesn't really reflect the real rank of your blog.
So that's it guys see you on my next post....
Wait, I forgot to tell you the main reason why I posted this

How to Improve Alexa Rank for Your Blog

Now you know how Alexa tracked their traffic and determine the rank so improving them is a rather easy question. What you need to do is just grab an Alexa toolbar right on their official website, on either chrome or firefox and then what you need to do is keep visiting your blog pressing f5 as hard as you can, and just wait sometimes later your rank will improve blazingly fast

Getting your mind blowned after reading this post? I hope not because I will have some times with the police if you do. Be sure to check out our other post at Technozzz, and check out why you and your friend should star a blog now

Why Having too Much Widget Is Not Good for Your Site

Useless Widget

I wonder why there are still a lot of people there who have so much widget on their site that it turns out to be annoying, well it is okay if you have widget like popular post widget, social sharing widget, it is fine. But when some blogger decided to put music, weird spammy badges widget, and custom mouse maybe? Of course I know that it is up to them do to what they want, but I still want to express my opinion about all of that.

What about the social sharing widget?

Just like what I said earlier, social sharing widget is okay, it doesn't really make the visitor mad, it is nice to look at and make the site turns to be more professional. So for these post I am just gonna talk about the annoying mostly useless widget that a lot of people like to put on their site. Most of them are a widget that automatically plays a music everytime you visit the site, some spammy widget that act as a badge, and some other widget

Why do I do not recommend this widget?

Probably the reason for me to not recommend the widget that I listed bellow is because most of them is useless, or have a little uses and doesn't really relate to the site itself. It make the site loads slower because the visitor needs to process more data when visiting the site. The widget doesn't look professional at all so your site doesn't look professional if you have too much widget like this. Most of them is just a way for people to get dofollow backlink, people who is lazy and wanted to get quick dofollow backlink could just build a quick widget put some clickable link onto it and make it a dofollow link, share it to everyone, free easy dofollow backlink

What kind of widget that I mean?

This is a list of widget that can be considered useless or annoying for your blog and removing them is a recommended action

Music Player Widget

Music Player Widget

You were browsing, reading some article and then you hear some music, wait where does this music come from, a quick check take you to a blog where it has a music widget, "well the music is nice let just keep it that way" you opened some post from that blog and hoola, the music started again two of the same music, overlapping each other, you scream and then you decided just to stop the music. This is what makes people get annoyed from music widget, when they opened another post the music started again and started to overlapping each other, this is why it is not really recommended to put something like this on your blog, plus not everyone like the same kind of music
Annoying Level : High
Increasing Load Time Level : High
Reducing Professionality : High
Usability Level : Medium

Badges Widget

Badges Widget
Have you ever seen a blog where it all of the blog filled with this so called badges widget, well the picture above is not really that annoying but when there are 10 of it showing something not really that useful you, it kinda give the impression that the blog that you are reading are not good looking at all. Really what is the use of this widget? Show off? Have you seen some big site that put these on their homepage? This widget is not useful at all, probably the only reason for someone to build this widget is to get backlink a dofollow one probably from the website that put this thing on. 
Annoying Level : Low
Increasing Load Time Level : Low
Reducing Professionality : High
Usability Level : None

More to come, I'm tired...

Speed Up Blogger Load Time Compress CSS

CSS Compressing

Load time has become one of the most important factor if you want to keep your visitor happy and stays at your site. A lot of people prefer blog with fast load time compared to the one with slow load time. Even though the blog with fast load time doesn't guarantee a better interface. So what you need to keep in mind is you need to make the load time of your blog as fast as possible. Here I'll give you some tips to improve the load time of your blog by compressing the CSS of your blog.

How to Compress CSS

There is a website that allow you to simply copy paste the code to the site and it will automatically compress your CSS code. You can visit the site here CleanCSS 
Now some of you might wonder what do you need to do with this website, well simply you need to get the CSS code from your site and paste it there, it will automatically compress it for you. Now where do you get the CSS file? This is a short tutorial that will help you with that.
Most of the CSS file in blogger's blog is stored within this HTML tag
 <b:skin>...</b:skin>
So now you need to find this code in your blog, and you wondered how to find it? It is really easy, just head to the Template section of your blog and then press 'Edit HTML', in the box find the code <b:skin>, and copy all the code between <b:skin> and </b:skin>, just backup it first in case something bad happen.

CSS Compressing
After you copy the code paste it to the box in CleanCSS site. In the compression option you can change how hard does the website will compress the code. Setting it to standard usually provide you with the best result. After you done that just press process CSS. You will get the compressed CSS bellow it, just copy paste all of the new CSS code between <b:skin> and </b:skin> and replace the old CSS. You will see your blog change a little bit don't worry because that is how this thing work, you will also notice the load time become faster than before.

CSS Compressing
This is the comparison to show you how effective it could be, the above picture is after and the bellow picture is before ( because before and after is too mainstream ). By the way CleanCSS also fix some error in CSS code, so it does double job for you freely

Thanks for reading our article at Technozzz, check out other tutorial to get free backlink from gov site

Top 5 Reason to Start a Blog

Why Start a Blog

I started to blog when I was still at 7th Grade, so it is already four years now. Although a lot of years has passed, I still never get bored writing a post just so that my reader could read something, and it also gave me some buck and from that bucks I am able to buy legit copy of games. So blogging gave a lot of thing for me, and now just to inspire other I wanted to express top 5 reason for you to start a blog from my opinion of course.

1. Improve your writing skill

This might be the best outcomes that you get from a blog. For a lot of people, one of the most important thing in blogging is to keep people to come to your site, and this is not an easy task, you will need to create a good quality article to make people not only come to your site, but stay on your site. Writing one is not an easy task but after some time you will get used to it and your skill will improve without you realizing it.

2. Meet a lot of people and gain fame

Whether from e-mail, comment or social media. After you started a blog you will find a lot of people along the way. Because blogging is a worldwide hobby you will find people from around your nation or maybe from around the world. So it will widen the scope of your friendship and who knows that you relationship could turn out to be a mutual relationship

3. It is a hobby

Maybe this is a really simple reason, but blogging is a hobby. Maybe before your life is full of passive things, not so much things change around your life, you only sit there in front of your television everyday watching cartoon. But after you started a blog you found a new hobby for yourself, and you start to forget your bad habit.

4. The positive comment

Aside from three reason that I stated above, there is one real good reason of why you should start a blog. Every positive comment that you get from your blog, reading everyone of them just give you something nice in your life. It is great if you could make all your readers happy and by making the people around you happy you will be a better person.

5. Make some money

Maybe this is just the side reason of blogging and focusing on this one could make blogging become much less fun, so you should just keep this one aside, but still getting few bucks from your blog is a great thing to have. Whether you only get $1 a month or $1000 a month it is really great to see that your hobby turn out to give you some money

After reading this maybe you will need to read some basic step in blogging, find out our post to differentiate between Dofollow Link and Nofollow Link
Keep up to date with Technozzz by subscribing to us or like our fanpage

How to Get Backlink from GOV Sites

Get GOV Backlink Free

Government and educational sites has become one of the biggest factor in SERP result for Google. Google used the amount of links that comes to our blog from Government and educational sites as a factor to determine the search result. Of course backlink from other website still counts, but government and educational sites is a special one. 
It will be really good if we get backlink from this two sources, but sometimes people get confused about how to get one, because getting backlink from government and educational sites is not as easy as commenting on a website. Especially government website as most of the websites doesn't even have comment form and there is no possibility for exchange link, but wait there is some easy way to exploit government website. Here is how.

List of GOV Sites to Get Backlink

How to Get Backlink

So maybe you are wondering now how to get these backlink, it is really easy actually. What you need to do is just open the link one by one and it will display some sort of redirect webpages, now click on the address bar and then change the url there, the default should be " http://technozzzblog.blogspot.com " and then change it to the url of your blog, and press enter. Now the webpages will display your blog as a link and it is dofollow link. You know what I mean right? You know it right? Yes free Dofollow Backlink from Gov sites. It is just like a miracle

Thanks for reading the whole article at Technozzz, still confused between dofollow and nofollow links? check the link.

How to Get a Lot of Followers in Social Media

Get lot of likes

Likes, follower and so on has been hunted by all the blogger in the world. Especially nowadays where the biggest search engine, Google use likes and followers in social media is used by them to determine the ranking of the blog in search result, a lot of followers in Google's social media, google plus will increase your author rank and author rank also contribute to your search result on google. 
So what I am going to show you today is a website that offers you likes by trading point. So you like someone else and someone else will like you. If you wanted to check it out visit their website addmefast.com.

Advantage of Using Addmefast

  • The followers and the one that likes your page will be a real person, or at least not a randomly generated profile
  • You don't need to spend any money to get a like
  • The interface is simple and it is really easy to get likes
  • Doesn't harm your SEO
  • You can choose if you want to get likes fast or slower
  • Lot of option, choose from google plus follower, facebook likes, google +1 and so on.

Disadvantage of Using Addmefast

  • Although it is a real people, the people who likes you will rarely do any contact with you whatsoever, and most of the profile that they created was just for doing this kind of thing
  • Sometimes the people who like you earlier will unlike you in the future

How to Use Addmefast to Get Real Followers in Social Media

  • Open addmefast.com and then make sure you already have an account in it, if you don't just register in it, you don't need to spend any money for that.
  • For the first time you will not have any point, so just bellow the free point choose the type of thing that you wanted to follow/like/visit to get your point. Mostly you will get 5-9 point a likes. And be aware that by doing it everyday you will can get a daily bonus of 100 points.
  • If you think that you already had enough point, just click Add Site/Page to add your Site/Page, in the type section put whatever type of thing that you want to get. In the countries section, choose from what countries will the likes or the follow comes from. The title is the title of your page. The url is the url of that page. Total clicks will limit the clicks to an amount. Daily clicks will limit the clicks you get daily. CPC is how much point you will spend for a clicks, the highest point will displayed first. 
A word from the writer : For me doing this is only good at the start but after sometimes you will feel like all the followers you already get is really pointless, because no one will interact with you, it is much better to get followers naturally.

Dofollow Link vs Nofollow Link Quick Comparison

Dofollow Nofollow Backlink

What is Dofollow Link?

There is no such a thing as a dofollow link, dofollow link is just a name used for a link that doesn't have rel='nofollow' link on it. But to make it easier to remember people called it dofollow or follow link. Basically by making a link dofollow it will tell google that the site pointed by the link is a trustworthy one, and this will help that site to get some pagerank point from google. 
If it is really hard to understand, think that each page or website is a city. Now think of dofollow link as a known road, with direction and some stuff. More trader will go by using that road because it is much safer instead of using other unknown road, or in this context nofollow link. This trader 'Google Robot' will bring some goods from the city to the other city beyond the known road. The more goods come to the city the richer the city will be, and that is what happen in website to, the more dofollow link that they get from a good quality website the better the site pagerank will be. 

What is Nofollow Link

Just as what I said above, nofollow link is just like an unknown road, no trader will want to use that road. So they won't bring their goods to the other city that lies beyond the world. So the point is nofollow link or should I say link with rel='nofollow' will not transfer any pagerank to the other website.

Dofollow = Spam

When a lot of people started to realize how important pagerank is and the only way for them to get pagerank is by getting a dofollow backlink from a good quality website. Many people started to spam a lot of comment with their links included in it, the good quality forum was flooded and it also affect wikipedia. This spammy comment will only give disadvantages to the website webmaster, and so google decided that they should have implemented nofollow link. So people would not just spam all their comment in a website.

Does nofollow link give any effect in blogging?

Just as what I stated above, nofollow link will not transfer you any pagerank juice, but still when a visitor see that link, and with a good optimized anchor text, people might be interested to check on the website it is linked to. This will give some visitor boost to the website

When should I use dofollow and nofollow

Dofollow link is very good if you use it to link it to other content that you have, for example internal linking, this will give some good effect to the blog pagerank, you may also give dofollow link to some tursted webiste, but there is no real advantages of doing that.
Nofollow link should be used in the comment section just to keep it tidy and free of spam comments. By implementing nofollow link in the comment section there less people will want to comment on your site, but every comment that come will be a good quality one

How to Determine a Link is Nofollow or Dofollow

One of the easiest way to determine if a link is nofollow or dofollow is by using a simple add ons
Firefox
NoDofollow ( Highlight nofollow link )
Chrome
Nofollow Simple ( Give red boxes around nofollow link )