4 Ways to Make Smartphone Battery Last Longer


Smartphone is your little companion, helping you to find a place when you were lost, give you some recommendation about almost everything that exist on earth. But still some people forget the fact that you need to take care your smartphone so that it will not go off at the worst time. Here I am going to tell you 4 ways to make your smartphone battery last longer

Never Leave Your Smartphone Battery to Zero

This is not a myth, never leave your smartphone battery to zero. This happens to me twice actually, I leave my smartphone battery to the lowest level and boom the next time I have my phone in my hand it doesn't want to charge at all. 
So really what is happening here? after a quick search on google, I found out that lithium-ion battery, which is widely used in smartphone nowadays becomes very unstable when it doesn't have any charge at all, and it will be dangerous if you try to charge it. So they implanted some self destruction device in it which destroy the battery once it reach zero percent

Do Some Quick Discharge

Instead of leaving your phone discharged until it reach 0%, lithium-ion battery do it best if you do some quick discharge, so it means that you need to charge your phone more often than before. Research from Battery University shown that discharging your phone to 50% before charging it again is better for your battery life.
Smartphone Battery Statistic

Calibrate Your Battery Once a Month

Almost all smartphone have something that able to calculate the battery life of your phone, but after doing some quick discharge all the month this thing could have been miscalculate the remaining battery life of your phone and so it needs some recalibration. Here is quick tutorial to calibrate your phone battery.

  • Charge your phone until it is full
  • Turn it off and then charge it until it is full again
  • Unplug the charge, setting your phone display to never turn off, charge your phone again until it is 100%
  • Unplug it and leave your phone laying there until it turns itself off because the lack of battery
  • Charge your phone until it is full again, now you successfully calibrate your smartphone's battery

Don't Overstressed Your Battery

What I mean by overstressed your battery is leaving it in a really hot temperature for a long time, heat is never good for electronic devices and battery is included in it. A hot battery will lose it health much faster than a battery stayed in a cold climate, so keep your battery temperature low by not doing some heavy workout for your phone like playing games at the same time as you charge your phone. 

Do this simple things and you will not lose battery's life as fast as you do before, it is not a really hard thing to do, but then again don't overdo it, you don't need to stayed up late just to wait for your phone to be charged to 100% so that you won't leave it overcharged, keep it simple and just enjoy your life with your little companion

Subscribe TECHNOZZZ for more info
Achieve cross browser support with custom font by reading the post

Achieve Cross Browser Support When Using Custom Font

Applying Custom Font Blogger

Blogger has some nice font that you can choose from, but after sometimes you might feel the old fonts from blogger are really lame and you wanted to change them to the new one. Changing a custom font is easy but make it compatible with most browser is a little bit harder. 
When applying a font you will need to use a CSS member declaration @font-face, but using this one doesn't automatically make your blog compatible with most browser. Not all browser support the same fonts format, this table will tell you what type of font is compatible with a browser.
Browser Compability
As you can see right there Internet Explorer support only one type of font which is the .eot, mozilla with .ttf or .otf, Chrome with .svg, .ttf, and so on. So this basically tell us what type of font that we need to find to achieve a cross browser compability.

Step 1. Finding the font

The first step that you need to do to apply a custom font to your blog and make it cross browser compatible is finding the font that you want. There are a lot of website there that provide you with free fonts, one of the website that I found quite useful and with a cool design is http://www.fontex.org. In there you just need to search for the font that you wanted to use and then download it. You will get a .zip file, just extract that one, and you will get something like this.

Download FontNow after you get this you have completed this step and ready for the next one/

Step 2. Converting the font to each format

So like what you see there what we need is the format .eot, .ttf and .svg to make our font compatible with all browser. Now what you need to do is just convert the font that you have downloaded into one of these format, and if you think it is hard, well it is not because there is a website that let you convert the font into those format.

Visit this website @font-face kit generator, and then upload the font that you want to use there. Just wait for a few moment and they will send you a .zip file which contain all the format that you need.

Step 3. Uploading the font

Now after you got all the fonts that you need, you just need to upload those font into the web. For me I usually use dropbox to upload it into the web. Just create account on dropbox website and then upload all the fonts with these format there ( .eot, .svg, .ttf ). 

Step 4. Applying the font to your blog

After you upload all of the font format, you just need to copy each of the link to that font and save it in notepad just to make it easy. Now head to blogger and then go to the Template and then to Edit HTML, and head to <b:skin></b:skin> and put this code somewhere there, don't put it in the bottom though because it might lead to some error in displaying the font. Here is the Code : 
 @font-face {
    font-family: 'Arvo Regular';
    src: url('.eot url');
    src: local('Arvo Regular'), 
         local('Arvo'), 
         url('.ttf url') format('truetype'),
         url('.svg url#font') format('svg'); 
}
So that just it but make sure to change the name of the font in the font-family, in the src: local('Arvo Regular') and in local('Arvo'). So the first src: url simply tells internet explorer where they can get the font that is compatible with the browser. The second one is for the other browser except IE. the first and second src: local tells to check if the user already have the font, if he/she already have one skip the next step. 

Step 5. Using the font in your blog

Applying Font

If you want to change the whole font in the post head to .post-body in Edit HTML and change the font family name to match the one that you put before. Just make sure to put ' ' if the name consist more than one character. If you found any trouble just comment bellow and I will sort that out.

Subscribe TECHNOZZZ for more info about tech
Read our tutorial to make smartphone battery last longer

How to Enable Google Plus Comment in Blogger

Google + Banner

Google has launched their social media platform in 2011, which they called Google Plus. At first Google Plus doesn't really attract a lot of user, because most of the people already use facebook back then. But Google tried hard so that their social media can gain a lot of user, they started by merging together blogger account with google plus account, and they also tried to replace the default blogger comments with the new Google Plus comments.
The good thing about Google Plus comments
Google decided to replace the default blogger commenting system with their google plus commenting system. There are a lot of thing that you can get from Google Plus comments, here is a list of new feature that is implemented on the new comments.
  • Threaded Comments, threaded comments is a nice feature that you can get just by adding Google Plus comments to your blog. Threaded comments allow the visitor from your blog to reply to other comment. It is a good thing that will make the conversation become much easier than using the default blogger comments.
  • Privacy Setting, the visitor from your blog would be able to make their comment  public or private, it is a nice thing for the visitor if they just want to make their comments private and cannot be seen by other visitor.
  • Edit Comment, one of the bad thing about the default blogger comments is the you cannot edit the comment that you have posted. So with the new Google Plus comments you don't need to post a new comment just to edit the old one
  • Integrated Feature from Google Plus, by using the Google Plus comments the feature from google plus will also be implemented on your commenting system. One of it the ability to (+1) the comments just like in google plus and the comments that you have written can also be shared to Google Plus.
Okay that is the good things about Google Plus comments, but everything must have a bad thing as well, so this is a list of thing that you need to consider before implementing the Google Plus comments.
  • Visitor must have a Google Plus account to comment on your blog, this may become the worst thing about this comment system, because of this there might be less comment on your blog
  • All comments will be deleted if you change the domain name, so just implement this comments after you stick with your domain name
  • Google Plus comments system would not work for private or adult blogs

How to implement Google Plus Comments to your blog

Google Plus Comment System

So now you know what is the advantage or the disadvantage of implementing Google Plus comments on your blog, now if you wanted to activated this one what you need to do is head to Google+ section on your blog's dashboard and then check the box that says 'Use Google+ Comments on this blog'.
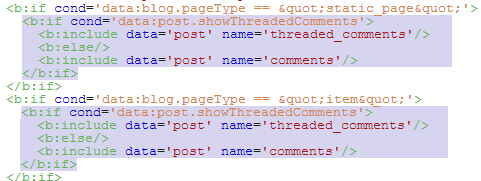
Now just head to your blog and see if the new comments are working. If you don't see any changes or the comments on your blog suddenly disappeared you must have use a custom blogger template and if you do what you need to do is just follow this steps to Implement Google Plus comments on custom blogger template
1. Head to Template and then to Edit HTML
2. Find this set of code
3. Replace the highlighted code with this code
<b:include data='post' name='comment_picker'/>
4. Just save the changes and you are good to go

That is all for our tutorial to Enable Google Plus Comment in Blogger, check out other tutorial at TECHNOZZZ, check out our tutorial to add meta description to your post to improve SEO

Improve Seo by Adding Meta Description to Blogger

Hello world today I proud to announce a new category for this blog that involve all around blogging by using blogger platform. Today as the first post in our new category I will post how you Improve Seo by Adding Meta Description to Blogger. Although Meta Description nowadays in not that important to rank a website it still is a factor wheter the user will click your website or not. 

What is Meta Description

Meta Description
Meta description shown as the description bellow the search result
So what is meta description?. Meta Description is a meta tag used by a lot of search engine to know the description of a page from a website. As shown above google used meta description to let the user know what lies between the website. As I just stated above, it is not really a great factor to determine the rank in SERP. But a well optimized and catchy meta tag will allow you to attract more visitor to your site

Adding Meta Description

Add Meta Description
To add meta description you just need to do the following things. Head to blogger and click the website that you want to add meta description, and then click "Settings", in there just edit the Description. Make sure you choose yes on"Enable search description", and then put the description of your website just bellow it. 

Add Meta Description
Wait you are not done yet, you still haven't add unique meta description for each of your post. To do this just head to Posts, and then click edit on the post that you wanted to add meta description. If you choose yes on "Enable search description" you should be able to find "Search Description" just on the right side of it. Click on it and put the meta description of your post on it. If you done this two step, you just need to check if your meta description is already there, visit this website, and put the link of the page that you wanted to test, and then press submit. After doing that make sure that the meta description that is listed on that website matched the one in yours.

What if Meta Description does not work

Don't panic if you already did those step above and the Meta Description on that website shows up emtpy. You might used a custom blogger template, and some of them proved to have some trouble with the blogger interface, so if you use one you just need to put some code in the <head> section of your blog. To do this navigate to Template and Edit HTML and then find <head> put the following code just after it.

<b:if cond='data:blog.metaDescription != &quot;&quot;'>
<meta expr:content='data:blog.metaDescription' name='description'/>
</b:if>

After you done this make sure that the meta description displayed properly on the website that I pointed out earlier

Click for more info about gaming and pc tweaks
Confused between Crusader Kings 2 and Europa Universalis IV? check the post out